Background
Cassette tapes of speeches have been made in 2000 in locations which are not studio like environs for recording (i.e. contain various sources of noise such as fans, folks moving about, traffic etc.). The cassettes were then converted to CDs in a recording studio in 2014. Unfortunately there was no audit or oversight for the studio digitizing process and now we discover that most of the the digitized tapes, except a rare few are very corrupted due to (most likely) faulty recording equipment used in the studio (henceforth this noise is referred to as “studio induced noise corruption”). This is in addition to noise owing to poor recording conditions described.
The original tapes have been misplaced , so the question of re-doing rightly doesn’t arise.
Edit: We don't have . Wav files either. All we have is two sets of CDs given to us by the studio. One set has files in . mp3 and other in . amr format.
- These tapes are in few hundreds . Typical duration of each file for a tape is about 45 minutes . Files for tapes are available in
.mp3and.amrformat only. - Some of the files are fine, in the sense that audio can be deciphered despite the extraneous noise caused by sources while recording . However, most of the files are noisy and useless due to studio induced noise corruption being the main culprit.
Question
We are looking for a solution that can remove the noise to the extent possible and to reduce / remove studio induced noise in a quick manner.
Points to keep in mind while answering
Files have been uploaded to Soundcloud in
.mp3format as.amrformat is not acceptable, though subsequently we discuss.amrformat.Here is an example of typically useless for hearing file
We are not looking at perfect extraction of audio to match digital record quality. We are looking at a final enhanced audio quality at a minimum level such as this file.
Paid software is fine (we have WavePad Masters sound editor v9.34 Pro version with us. We already tried our hand at it. More about that in section below. Windows based software is strongly preferred unless there are exceptional reasons for Linux based software (Linux adds to learning curve).
If you wish to suggest alternative software(s) or a combination of software that suits better, please do so, but bear in mind that it should not have a steep learning curve. In any case, your answer would need to detail the steps in an idiot proof way.
We do not wish to add any hardware to solve this problem unless there is exceptional benefit in doing so.
Since each file is about 45 minutes in duration,we wish to spend not more than 60 minutes (ideally) on resurrecting it to a minimum audio level such as the file mentioned in point 3 above. Also bear in mind that we are looking at processing hundreds of tapes,so,it is important to minimize time spent in processing.
Bounty: We (my brother in USA and me in India are working on this,with him doing the editing and testing part). I intend placing a bounty of 100 on this question but may not do so after two days when it is eligible. Reason being that this project is very dear to us and we wish to have a working solution to award the bounty. Also,the methods suggested by you may work fine on a sample segment but need to be validated over full length records which would add to time and bounty period may expire. Being a trusted user on SE.Android Enthuisasts , please believe me that a bounty would be awarded to a working solution.The final digital output needs to be in
.amrformat only, since it is convenient for sharing on social media and to download and listen on Android phones without occupying much space.It would be nice if you can add to your answer a clip of the denoised segment for us to assess the efficacy of your method quickly.
Interalia,please do try to address questions raised in the section below in our attempts to solve the problem ourselves (marked in italics-please see 3(a) and 4 ).
What we tried
A word of warning,both of us are not technically sound (pun intended:),in these matters and we tried to find our way Googling for solutions. So,our approach may be entirely wrong or partially right.
We used Wavepad Pro to arrive at the quality mentioned at point 3 in the notes above. But this doesn’t work with noisy tapes (likely due to studio induced noise).
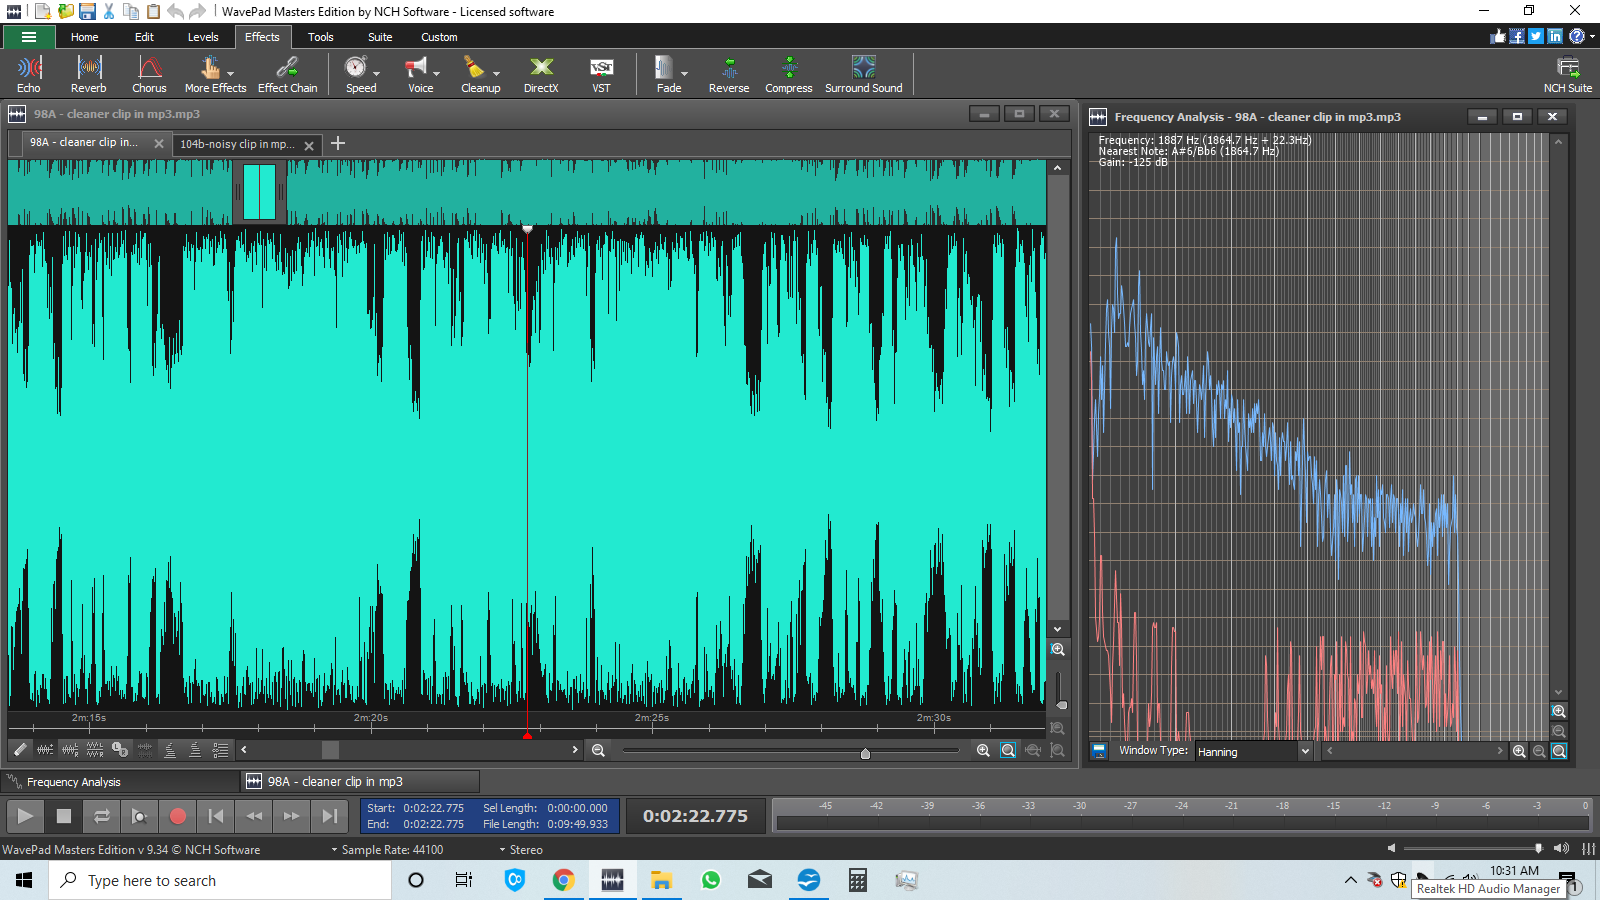
- A typical time domain and frequency domain representation (Hanning) of a clean clip (prior to any sound edits) is shown below.
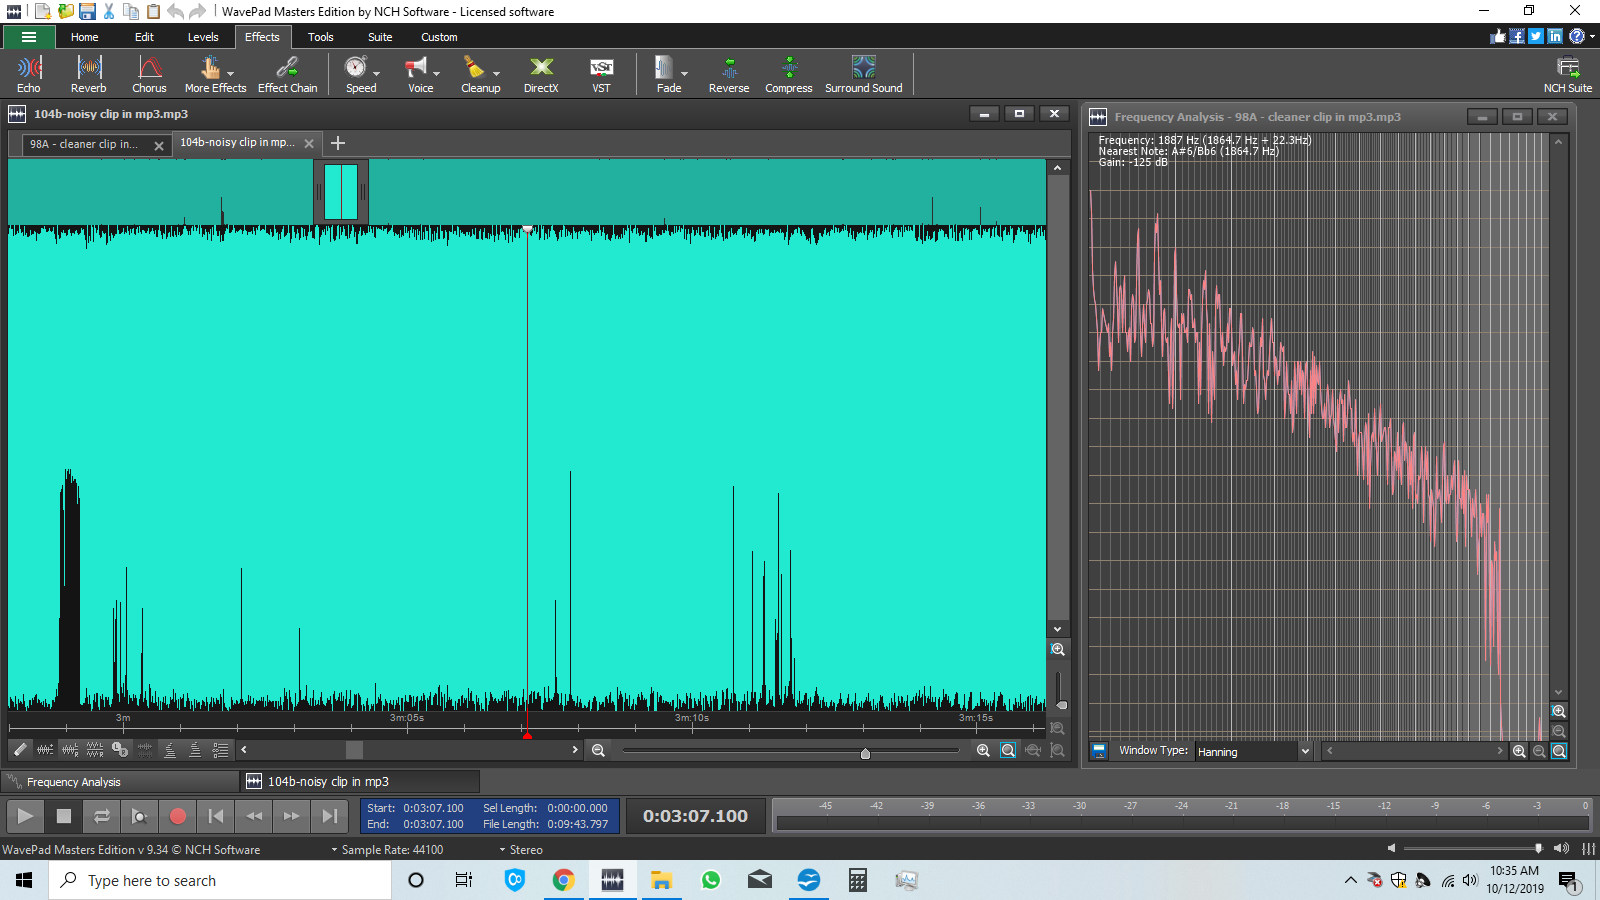
- A typical time domain and frequency domain representation of the noisy clip (prior to any sound edits-refers to Point 2 under question) is shown below:
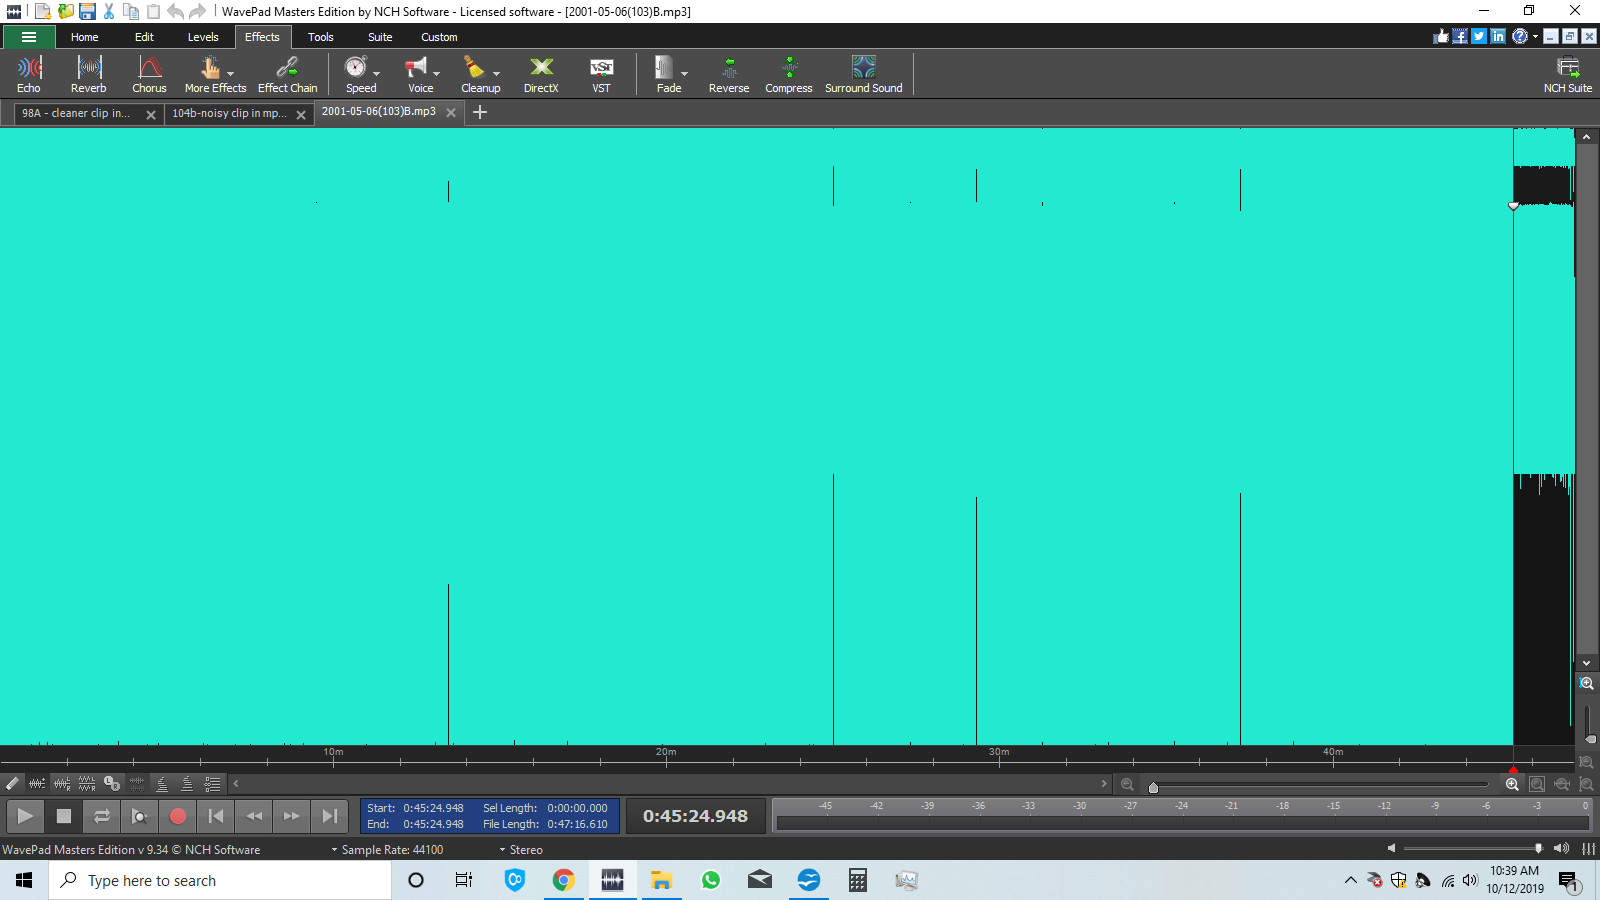
- The noisy clip clearly shows a “noise band” in time domain as evidence of studio noise corruption, past the recording ending (to the right of the cursor in the figure below):
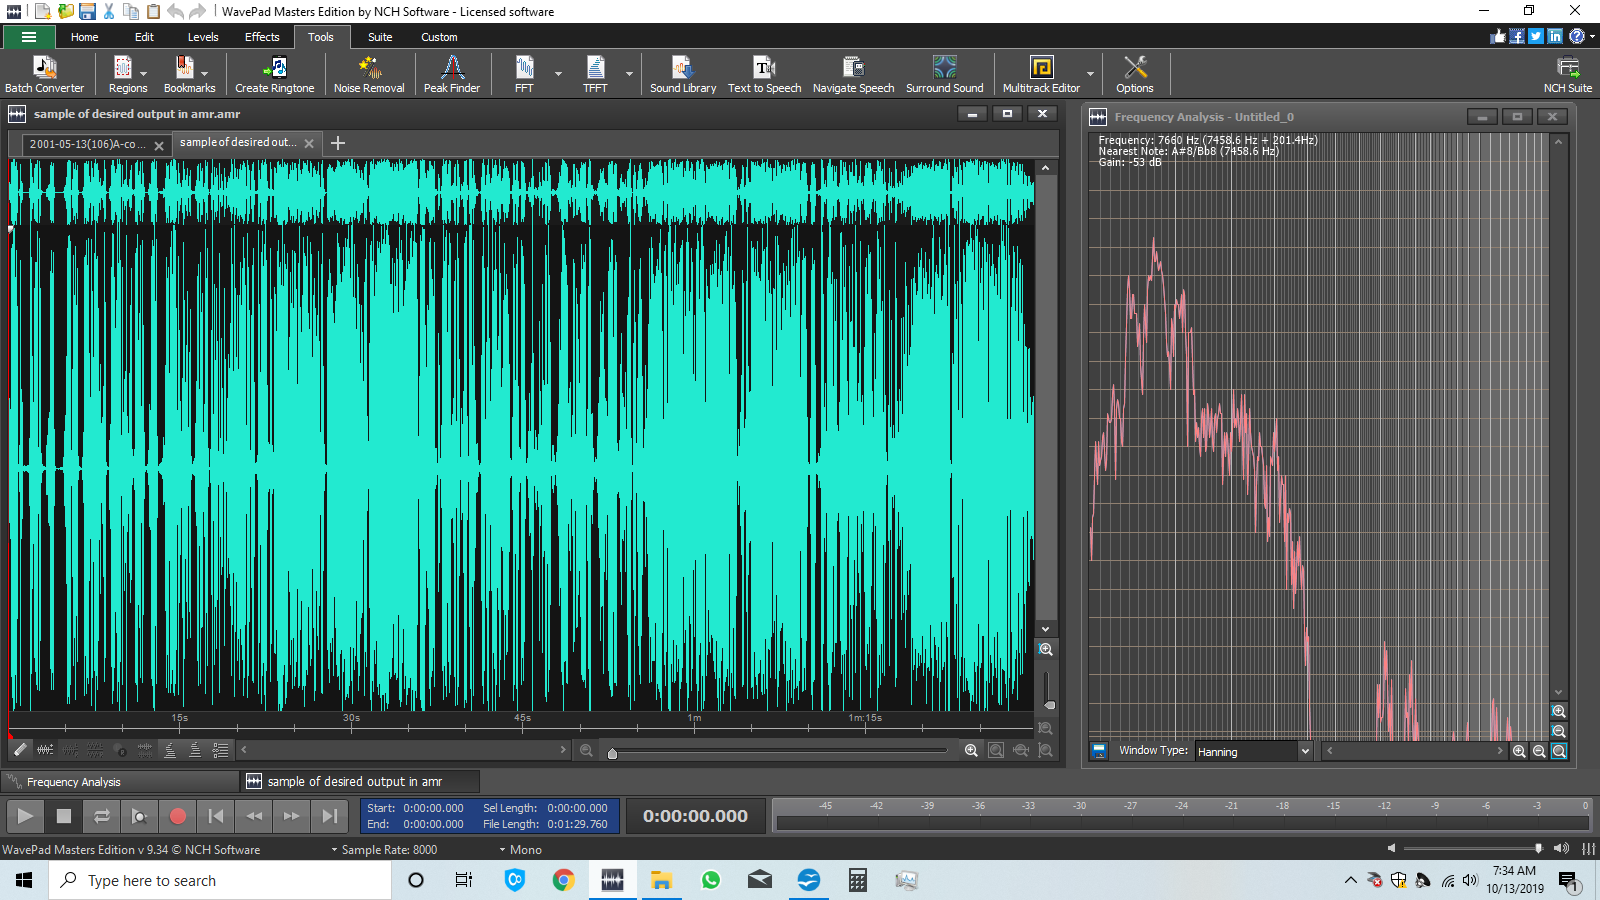
- The time domain and frequency representation for a typical desirable clean file in
.amrformat is shown below:
Process followed (by hit and try)
Used “Auto spectral subtraction” in the WavePad Editor with Preset “Apply to Voice” and with Silence to audio set to 20% (their default). This did not eliminate the background noise successfully let alone the corruption introduced in digitizing.
Used “Grab noise sample for spectral subtraction” and perform “Spectral subtraction based on noise sample”. This approach is sculpting each file for its specific noise characteristics and seemed to work partially. However was mostly was a gamble as it appeared that so much depended on the noise sample location selection between the sound bytes and several trials were required to get it right. Plus another issue observed sometimes was that there was undesired background introduced into the recording due to correction. Picking the sample from the noise band after the end of the recording seemed like a great obvious idea but absolutely did not give good results for reasons unknown to us.
Furthermore, even when the noise was successfully eliminated or reduced substantially, the speech was now slurry and hard to follow (the original voice was very sharp and clear).
Finally implemented the sledge hammer approach consisting of the following steps in noted sequence (all steps reference WavePad nomemclature):
(a) Convert the `.mp3` file to `.amr` format and do edits on the `.amr` file only instead of `.mp3` file.  Earlier trials involved `.mp3` file editing and then converting to `.amr` (*not sure which is a right way*).


(b) Use Auto spectral subtraction with Noise preset to Voice and Silence to Audio Proportion to 100%.

(c) Use Multi band Noise gating with 0 dB noise gate level.

(d) Use high pass filter of 1000Hz (used only if it seems to help).

(e) Use Equalizer boost of 10dB from 1001Hz to 6500Hz.   The steps (e) and step (d) above were used to add sharpness to the vocal which it seems to do, however,  was also too jarring at places.   Admittedly this is equalizing very overdone and blind shooting without expertise.
The result of this sledge hammer approach is a pretty clean file in terms of the noise elimination across a variety of files. However the big problem now is that the speech is very slurry for those files with studio noise corruption – while files without studio noise corruption come out decently with this process. A clip of file after correction and showing slur
We are at a loss to rectify this slurry speech and besides this trial and error process takes nearly 3 hours for a 45 minute file !


